How do I sign-up for Data Exchange?
Go to https://portal.ezidox.com/#/registration and sign up with your email address, select your industry vertical and create a password. You will receive an activation email in your mailbox, follow the link, complete your details, and confirm Terms and Conditions.
- Click on ‘Get Started’; you will be sent to the Data Exchange [Ezidox] website
- Choose a password and click on register
- Accept Data Exchange [Ezidox] T&Cs
- Complete your personal details and click on the Save button
How do I access Data Exchange on a day-to-day basis?
Anytime you want to access Data Exchange [Ezidox], you can login fromportal.ezidox.com or via your Custom URL if this has been configured. Contact our support teamsupport@ezidox.com, to activate a Custom URL and set-up the full white-label experience for your customers/team.
How can I build out my Profile?
- Upload your Profile picture that will be displayed to the Customers
- Change your details
- Input a landline number, which will be shown to your Customers instead of the mobile phone.
- Change your password
Collectors will receive the following notifications:
- Daily update for all Document Requests managed, including:
- documents uploaded
- comments/notes received
- Receive an email notification when a document is uploaded
- Receive an email when a new chat message is added to Requests that you are watching.
- Receive email when a Note is added to Requests that you are watching?
- Receive email when a new Request is shared with you?
- Choose to watch a Document Request when is shared with you
The SMS contains a 5-digit numeric code that users need to enter to be able to login.
- 2 Factor Authentication via SMS can be enabled:
- Collectors:
- at Company level: all the Collectors associated to the company shall enter 2FA to be able to login
- at User level: Collectors can opt-in for 2FA
- Customers:
- at Company level: all the Customers shall enter 2FA to be able to access applications belonging to a company
- at User level: Collectors can opt-in for 2FA
- Collectors:
How can I create a Document Request?
What is the Primary Customer in a Document Request?
Two fields are worth your attention: Reference: It is a free text field.
- Reference: It is a free text field. When you create a new Document Request
- Docs Due Date: it specifies when the document should be provided by the Customer. This field is also used to drive the automatic Customer reminders.
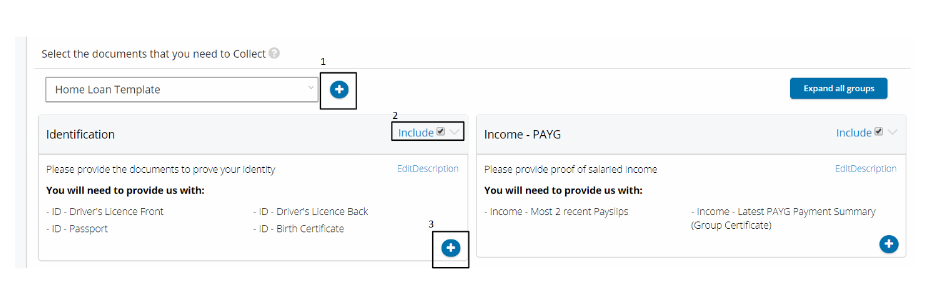
How do I select the documents I need to collect?
How do I add ‘Attachments’ to send to the client?
How do I add additional Applicants to the Document Request?
Once the main Customer is created you can add other applicants who will participate to the current Document Request (e.g. In a joint application – Husband and Wife relationship; Accountant) toggling the second section of the page ‘Do you need to collect documents from anyone else?’. This will expand the section giving you the option to Create an additional Customer. The process is like the Primary Customer, but there are a few differences:
- Can Customer see all documents requested to Additional Parties? When the selection is switched off, the primary Customer will see only their own document list
- What is the role of this Additional Party? If you select ‘Sole Trader’, ‘Company’, ‘Trust’ or ‘Partnership’ the ABN and company details fields will need to be filled out.
- Do you want to notify this Additional Party of this Document Request? When you toggle this off, then the document[s] will be uploaded by you or the primary Customer only
- Can this Additional Party see all documents? If you decide to turn this setting to off, the Additional Customer will ONLY see the documents are being requested to them. They will not be able to see the documents requested from the Primary Customer
How can I share the Document Request internally?
If you have configured more than one user in Data Exchange [Ezidox], you may also decide to share the Document Request with a colleague. Simply select YES under ‘Do you want to share this Document Request with anyone from your organisation?’ and search/select your colleague.
How can I add a custom message to Customers?
This section allows you to include a custom welcome message to your Customers in the invitation email.
How can I adjust the Customer notifications?
- Frequency of recurring notifications [days]: you decide how often your Customer is notified
- Send reminder 3 days before due date: if you have set a Due Date, you can remind your Customer three days before the due date
- Send reminder on due date: you can remind your Customer also on the final day
- Notify Customer when 100% documents have been uploaded
- Send daily digest email: If there have been any changes on the Document Request, an email to the Collector and Customer will be sent notifying those interactions.
How can I save the Document Request as a ‘Draft’?
If you would like to come back to the Document Request and make changes before sending, click on ‘save draft’. A draft of the request will be saved in your portal and visible to you on the dashboard. Once you are done, click on the “Next” button and you will enter the Summary screen