How can I access the Data Exchange settings?
To access Collector settings, click on your Name on the top right section of the screen, and select ‘Settings’.
This screen will show you the Settings Items, which depending on the Security Role you have been assigned, it will show you more/less items.
When you create an account on Data Exchange you will automatically be the admin for the portal. This allows special permissions to help build out your Customer & Team experience.
How can I set-up my company?
Enter in the following information to create your company account:
- Name
- Entering your company name will create the company account and allow you to invite users to join.
- Description
- Website
- Logos
- Adding a logo will ensure your Customers see your brand in the portal and on the automatic notifications.
- Sender Authentication
- Allow Customers to view their Document Requests without entering credentials?
- If Yes, Customers will be able to access the portal without needing to create a Data Exchange [Ezidox] Customer Account.
- Allow Customers to view their Document Requests without entering credentials?
What can I see on the Dashboard?
The dashboard will show basic reporting & statistics regarding the Document Requests created by the team.
How can I set-up developer access to the APIs?
Developers section is used to create and maintain API keys and Secret to integrate with other platforms.
To enable Developers:
- Go to Settings choose “Developers” option from the left navigation menu and click “Add new+”, you will be directed to a new pop-up window.
- Enter the mandatory Fields “Name” and Ip Address.
- To access the specific API Documentation with examples and step by step guide, please email us atsupport@ezidox.com
How can I see all Document Requests created by my team?
You can see all Document Requests created by your team under ‘Document Requests’ in the left-hand navigation. This view is only visible by team members with the ‘Admin permission level. You can search and access Document Requests from here.
How can I manage user access?
Admin can invite other Collectors to join with the “Invite New Collector” button in the top right corner
Administrators can also choose if the role of the new account:
- Admin
- Collector
- Assistant
- Helper
Administrators can Enable/Disable other users from the Collectors section in the “Users” screen. You can also see if a Collector has joined or not.
On clicking “Disable” for the user, the account will be disabled. The user will not be able to access their account.
When the admin clicks “Enable” button, the user account will be reactivated.
Admin can see the detailed the list of all the sender in the “Senders” section of the “Users” screen.
How can I create a ‘Custom Template’?
Select “custom template” option from left-side menu and choose to create “new+”. You will be directed to the custom template setup page.
In the first tab ‘Name and Welcome Message’, Enter the Name of the Template (e.g. Home Loan template – PAYG), add an optional description, select the Sharing level, and add a specific ‘Welcome Message’ linked to this specific template. This way, you can have different default messages when you create a Document Request based on the Template that you choose. You will also be able to include dynamic content in the email by selecting ‘Template Placeholders’ such as ‘Name of the recipient’ ‘Creator Name’ that will be replaced with the respective details.
In the “Groups & documents” section you will be able to create the template structure of the document checklist. You can create distinct groups to group documents by category (e.g. Proof of Identity, Income, Liabilities, etc.) and in each group you will be able to add multiple documents to collect (Drivers Licence, Passport; Pay slips, Bank Statements) You can choose if you want the group/document to be selected by default, by checking the ‘Is Selected by default’ box. In the case that the group is not selected by default, when you start a new Document Request and load this template, you will be able to select the Group but will not be included by default. Useful if you do not normally need a specific type of group/document but you still want it to be there.
To Create a Group, simply type a name and description. Search for a document to collect from the list on the right and click the + button to add it to the group.
In the third tab ‘Attachments’, you can link specific documents to send to this specific template. This means that, if you select an Attachment from this list, whenever you start a new Document Request and select this template, the Attachments selected under this list will be included by default.
How can I create a ‘Custom Document’?
You will be able to manage your own documents to request library in Data Exchange [Ezidox]. To do so, you will need to:
Select “Custom Documents” option from navbar menu and choose “create new+” on the top right corner.
You can also edit an existing custom document by choosing the edit option.
You will be directed to the custom document setup.
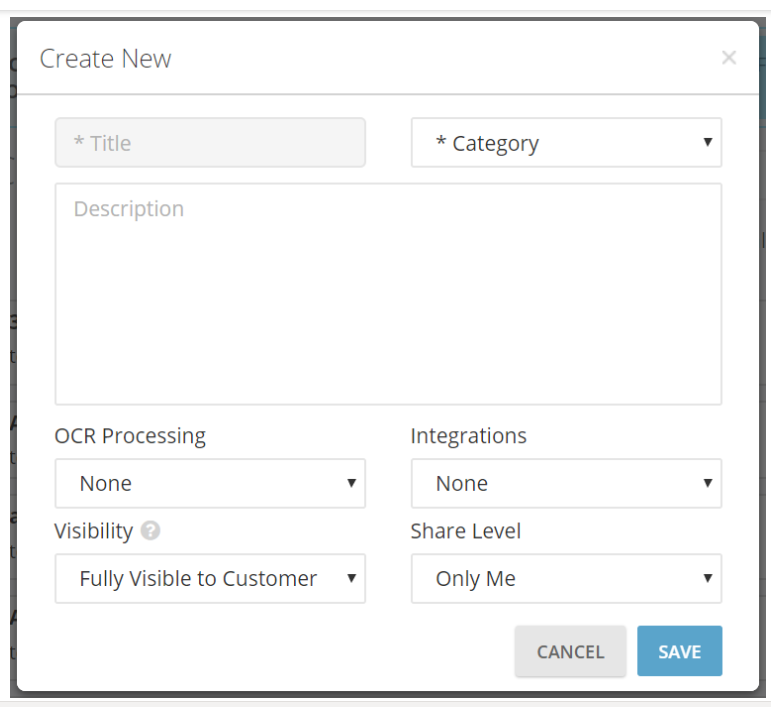
- Title: Name of the document to request. (e.g. Individual Tax Return)
- Category: Select a category appropriate to the specific document you are creating. (e.g. Financials)
- Description: Use this section to describe the properties of the document you request (e.g. Please upload your most recent Individual Tax Return. Please make sure your personal details and annual income is visible)
- OCR Processing: If the TFN needs to be removed please select TFN Removal Option. Data Exchange [Ezidox] has Optical Character Recognition tool embed, that will search for the words TFN or Tax File Number and it will redact it automatically from the document!)
- Integration: If you have integrated Data Exchange [Ezidox] with any of the Bank Statements third party service providers (DocuSign, Proviso, Mogo Bank Connect, Cashdeck, Credit Sense), you will need to flag the document, so it loads a different modal whenever a Customer wants to upload a file against this document.
- Visibility: Three levels of visibility are currently available.
- Fully Visible to Customer: The document can be uploaded and is fully visible for both, Collector and Customer. Document is included in the progress bar calculation.
- Customer List Only: The document is fully visible for both, Collector and Customer, but only the Collector can upload. Document is included in the progress bar calculation.
- Collector Only: The document is only visible for the Collector. Document is not included in the progress bar calculation.
- Share Level: Select ‘Only Me’ if you are the only one that needs access to this document. Select ‘My Company’ if you want to share it with your Team!
How can I create ‘Attachments’ for the Customer to view or sign?
Go to the Attachments section in the left part of the screen.
Click on the “create new +” button located on the top right corner. This will direct you to a new popup window. Enter the details (Name, Description).
If you want this Attachment to appear by default every time you create a new Document Request, simply check the field “Include when creating new Document Requests”.
To create an Attachment with e-signature, click on the small arrow next to ‘Select Integration’.
Once done click on the Next button to upload the file form your Local Drive, Dropbox, or Google drive
If you have not selected an integration the process is completed.
If e-signature process is selected, follow the below steps.
Click on the small arrow next to the template and select create new template. This will direct you to your e-signature provider. Follow the steps shown to enable the template.
What systems can Data Exchange integrate with?
Data Exchange [Ezidox] enables integrations with third party apps for ease access of document collection.
- Bankstatements.com.au
- DocuSign
- e-sign live
- MogoBankconnect
- Credit Sense
- Zapier connect
- Embed any form or web page directly into Document Request
In all the integrations, you will need an active subscription with the third-party service.
How can I Integrate Data Exchange with bankstatements.com.au?
To activate bankstatements.com.au integration, Go to Settings -> Integration, and click Activate. Enter your four/eight-digit referral code and save the settings. Once the integration is active, you will need to tell Data Exchange [Ezidox] which Custom Documents needs to be treated as a bank statement. To create a bank statement document, go to Settings choose Custom Document from the left navigation menu and click on “Create New”; a pop-up window appears and enter name, category, and description (optional). In the “Integration” Drop-down, select BankStatements.com.au option and set the shared level to my company if you wish the custom document to be accessed by other Collectors of your organization and save it. Once successfully created, you will be able to add it to your custom templates and Document Request.
How can I Integrate with DocuSign?
To integrate with DocuSign, go to settings from your Data Exchange [Ezidox] account choose integration from the left side navigation menu an activate DocuSign. Enter your credentials for either your development or production instance (production and development instances will have different credentials) as shown in the pop-up screen and save the settings. Once you have completed the configuration on Data Exchange [Ezidox] side, the remaining must be done on DocuSign portal. Go to your DocuSign Admin panel, under Integrations -> Choose Connect to add a new connector. This is required to upload the documents back into Data Exchange [Ezidox]. Select Add Configuration -> choose Custom Now, in the settings enter the followings: • URL: https://api.ezidox.com/api/ESign/Docusign • Enable Log: Yes • Require Acknowledgment: Yes • Associated Users: Select Users to Include and select the user you have entered in Data Exchange [Ezidox] • Envelope Events: Envelope Signed -> Completed • Recipient Events: Recipient Signed -> Completed
How can I embed any Form or Web page directly into Document Request?
- Under Integration, choose Activate “Embed any form or web page” there is No setup required at this stage. The next step is to create a custom document to embed the form or web page directly
- Go to Settings and choose Custom Document from left side navigation menu and click on “Create New” or choose an existing document to configure; enter name, category, and description.
- In the “Integrations” Drop-down Select Generic Form and configure integration. Enter the following Details and save the settings
- a. Enable Yes to “Allow Collector to customize the Form URL”; If you want your team to be able to edit the link in each Document Request.
- b. Enable Yes to “Allow Customer to mark the form as completed”; If you want Customers to notify you when the form is submitted (if you have a way to submit the form in PDF back to Data Exchange [Ezidox] let us know and we can close the loop via API services)
- c. Form URL: URL of the form (https//)
- d. Display Chat in the Form Viewer: enable Yes If you want to show the chat in the form viewer Once successfully created, you can then add it to your custom template.
How can I integrate with OneSpan?
Live Instructions to follow in OneSpan portal: Access the Admin section of the OneSpan portal from your control panel and choose integration menu.
Locate the API Key and copy it – you will need to paste it in Data Exchange [Ezidox], In the Callback URL field, enter “https://api.ezidox.com/API/ESign/ESignlive” In the “Select Events” section, enable Document Signed and Transaction Completed. Save the settings.
Once you have completed the configuration on OneSpan side, the remaining must be done on Data Exchange [Ezidox]. Instructions to follow in Data Exchange [Ezidox] portal:
- Go to your Username -> Settings -> Integrations -> “Activate” under OneSpanLive Then you need to enter your API Key that you collected before, for either your development or production instance (production and development instances will have different credentials) in the pop-up screen as shown below.
- You will be using a ESignLive Production Instance; you can confirm this by checking your ESignLive login page. If it is “https://apps.esignlive.com.au/login” then you are using the Production Instance. If instead it is “ https://sandbox.esignlive.com/login ” then you are on the Development instance.
- Then save and you have now integrated Data Exchange [Ezidox] with OneSpan live.
How to integrate and configure with MOGOBankconnect?
Go to your Username -> Settings -> Integrations Choose to activate under MOGOBankconnect and you will be directed to a Pop-up window.
Enter the details and save the settings, a confirmation box on bottom left will be displayed Once successfully saved you can start configuring MOGOBank integration into the Document Request
To create a MOGOBank configured document
- Go to Settings choose custom documents, select “Create New”, enter Name, Category and Description (optional).
- Once the settings are successfully saved you will be able to create the Credit Sense integrated custom document
- To create a Credit Sense enabled custom document
- Go to Settings choose custom document an select Create New+ option from the top right corner, you can also integrate for an existing custom document by choosing the edit option.
- In the custom document menu, enter the details an choose the integration level to Credit sense and save the settings. Once successfully configured you will be able to add it to your requesting documents.
How do I integrate with Credit Sense?
- Click on the activate button under Credit Sense to enter your store code an save the setting.
- Once the settings are successfully saved you will be able to create the Credit Sense integrated custom document
- To create a Credit Sense enabled custom document
- Go to Settings choose custom document an select Create New+ option from the top right corner, you can also integrate for an existing custom document by choosing the edit option.
- In the custom document menu, enter the details an choose the integration level to Credit sense and save the settings. Once successfully configured you will be able to add it to your requesting documents.
How do I integrate with Zapier?
- Sign into or create an account with Zapier if have not already.
- To use the Data Exchange [Ezidox] connector ensure you have activated Zapier within Data Exchange [Ezidox] and then enter the API Key and Secret within Zapier.
- Begin setting up triggers and actions to carry out tasks for you. You can create your own workflow between Data Exchange [Ezidox] all your apps.
What audit capabilities does Data Exchange have?
Data Exchange [Ezidox] keeps an audit trace of every interaction a User does in the system (e.g. login, upload, download, delete, etc.). Admin users can access this audit trace from Audit section.
How can I manage Roles and Permissions?
As introduced before, Admin Users can create their own Roles by linking different type of permissions. We recommend cloning an existing role and modifying the permissions to create a new role, this will ensure you retain important configurations.
To clone a Role and create a new one:
- Go to Roles and Permissions
- Click “Clone” from an existing one (e.g. you may want to extend functionality for the Existing Collector Role and Bypass the IP whitelist to allow the user to access from any location)
- Give a relevant Name. E.g. Collector – Bypass IP and define the Share Level.
- Check/uncheck the permission/s you want to add/remove. From the previous example, check the Permission: “Collector – Bypass IP Address Whitelist Check”
- If the user needs access to Document Requests, set flag ‘IsAdmin’ to yes
- Save the New Role To assign the new role to a specific user:
- Go to Settings/Users
- Click on Edit
- Select the Role that you want to apply. The new permissions will be applied straightaway. The user will need to log out and login or refresh to see the new configuration.